Learn to detect damage and fix holes/cracks/scratches on your poly water tank. Find tips on welding poly, plus some safety precautions to keep in mind when working from inside your water tank.
1. How do I detect damages on my poly water tank?
2. Is it safe to climb inside water tanks?
3. Can I repair my own poly tank?
4. Can a polyethylene water tank be welded?
5. How do I remove scratches from my poly tank?
6. How do I fix a hole in my poly water tank?
7. How do I fix cracks on my poly tank?
How do I detect damages on my poly water tank?
A useful trick for detecting damage on your water tank is called the candling technique which utilises light to spot cracks/holes. The list below explores the various ways to do this technique.
A. Using the candling technique at night or when it's adequately dark outside:
1. With the use of light inside the water tank
Place a light source inside the water tank through the fill neck or manhole. Then inspect the tank from outside. Holes/cracks will be made more visible due to the light inside.
2. With the use of light outside the water tank
Alternatively, you can look through the fill neck or manhole of your water tank while someone else shines light from the outside of the tank in the area where there is a suspected crack.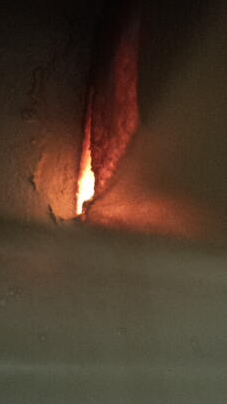
Crack on a poly tank seen from
inside.
WARNING: Don't use hot lamps (or other hot sources of light) when doing the candling technique. Make sure to use cool light to avoid damaging the tank.
POINTS TO REMEMBER:
- Have an extra pair of hands to help you.
- Water must not cover the area where there is suspected damage.
B. Using the natural light of day to do the candling technique (done with an empty tank and requires 2 people):
1. With a ladder, one person climbs inside the tank while another person covers the access hatch to prevent light from coming in. The person inside the tank does the diagnosis.
2. Alternatively, you can get one person on a ladder to lean into the tank manhole while blocking the light coming into the access hatch around their body. Since this darkens the inside of the water tank, it's easier to see light from the outside seeping through cracks or holes, indicating damage.
WARNING: Working in confined spaces is dangerous.
See safety practices for working in confined spaces HERE.
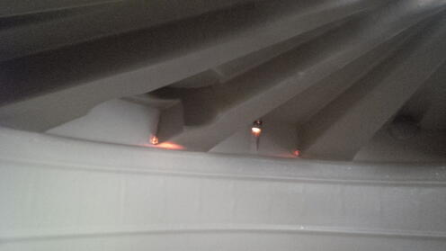
Inside view of a water tank: Holes are made visible by daylight
coming in from outside.
Back to top
Is it safe to climb inside water tanks?
No. Working in confined spaces is risky. A confined space is described as any space that is not intended nor designed for human occupancy. Anything can happen inside such as explosion or exposure to fire, engulfment by a free-flowing solid, and exposure to a toxic atmosphere, among other things.
Examining water tanks from inside presents the following possible risks:
• Sudden illness such as heat stroke or heart attack
• Difficulty in rescue operations in case of an emergency due to difficult exit and entry
• Inadequate oxygen levels causing asphyxiation or loss of consciousness; drowning when water tank is not completely empty
Precautionary measures must be observed prior to inspection.
Having a professional carry out the procedure is the safest option. Or, if you can carry out the work from outside, then do so.
Critical notes when working in confined spaces
When considering tank inspection from the inside:
- Identify risks and eliminate them.
- Prepare an emergency plan that’s easy to undertake in case something goes wrong. A safe recovery process (safe for the rescuer and safe for the rescuee) must be part of the emergency plan.
- Have an able and competent extra person be on stand-by for support in case of an emergency. This person must have a clear understanding of the risks involved.
Online sources for safety precautions when working in confined spaces:
Back to top
Can I repair my own poly tank?
Yes. However, although many people have chosen to repair their own damaged poly tanks (in fact, there are several DIY videos on YouTube) you have to be honest in determining your own skill set and assessing your own confidence. Understand the risks involved and the possibility that your repair efforts might not work.
For simple damages such as small superficial scratches, a simple scraper, flap disc grinder, and small gas torch will allow you to clean up the tank to an almost new condition.
If the tank has a small crack or pinhole above the water level, you could use a sealant to stop dust and small insects from entering. Note that although some glue (adhesives) or caulks adhere to polyethylene, the results can be unpredictable. This is especially true when it comes to more serious damages.
Back to top
Can a polyethylene water tank be welded?
Some people opt for welding polyethylene, but this is something that is best done by a professional poly welder.
Firstly, the right welding materials and plastic welding tools (and technique!) must be used. The process involves heating polyethylene and pressing or fusing the contact surfaces together (i.e. patching a defective area of the poly tank with another piece of poly).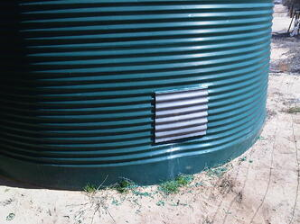
Welded poly water tank.
Welding can also be done using a welding rod to attach the pieces together. As stated above, seeking the help of a professional poly welder who would use an extrusion welder to fix your water tank, is advised.
Back to top
How do I remove scratches from my poly tank?
Plastic scratches can be repaired by using a scraper and flap disc grinder and a small gas torch.
Please note that scratches are displaced polymer and are superficial. They don’t affect the structural integrity of a poly tank.
Back to top
How do I fix a hole in my poly water tank?
The best way to fix a hole in a poly water tank is with the use of a professional plastic extrusion welder. With a plastic extrusion welder, you inject molten polymer rod into the hole via a bull-nose tip (part of the machine). Once cool and dry, cut the protruding bit with a knife and smooth out. 
Remember to drain the water first if the damage is below the water level and especially if access inside the tank is required. Although the repair can be done to some extent using a wet seal (with varying results) the most ideal way is to drain the tank completely and then fixing the area by poly welding.
If upon diagnosis you think that the crack is too extensive, consult the expertise of a professional poly welder who can fix the damage by extrusion welding rather than opting to fix the damage with a DIY method.
Back to top
How do I fix cracks on my poly tank?
1. Before anything else, ensure that the damage area and its immediate surroundings are clean and free of anything that could compromise the repair process (e.g. paint, oil, dirt, etc.). Also, when the area is clean, you see the extent of the damage much more clearly.
2. Note that's possible for damage to worsen during the repair process. With cracks, further damage is avoided by using a small drill bit to drill a hole at each end of the crack. This helps to relax the stress concentration of the crack, preventing it from spreading.
3. After you’ve done surface preparation, proceed by preheating the damaged area with a heat gun or torch, making sure to include a little bit of its surrounding area to ensure every part is covered.
4. By this point, you can press the polyethylene filler material into the damaged area and follow it up with more strokes from your torch. Then using a putty knife, press the molten material to fill the entire damage, aiming for the smoothest finish possible. When cool enough, you can trim excesses with your utility knife.
5. See how your poly water tank holds up by filling it with water and inspecting for any leaks.
Your poly water tank needs care. Inspect it every now and then so that any damage can be fixed before it worsens.
Back to top